

Parisian Macarons
Yields: 50 sandwiches
Equipment:
-
Weight scale (metric, in grams) *the macaron recipe is very precise, therefore everything needs to be scaled to set yourself up for success
-
Stand mixer with a whisk attachment
-
Rubber Spatula
-
Small saucepan with lid
-
Fork or candy thermometer
-
A few large bowls
-
Piping bags (reusable or 2 disposable) *these can be purchased at Bulk Barn, your local grocery store or online
-
Piping tip (medium round tip around 1/4" diameter- we use Ateco #803) *these can be purchased at Bulk Barn or online
-
Baking Sheet with parchment or a silicone mat
-
Pot
-
Whisk
Ingredients for Macaron Shells:
-
250g of icing sugar
-
250g of almond flour (Grind icing sugar and almond flour together in food processor and sieve)
-
60g of water (more may be needed for larger pot)
-
200g of sugar
-
200g of egg whites +15g for beginners and bad weather days
-
100g of sugar (separate to the sugar above)
-
2 pinches of salt
-
Gel-based food colouring (optional)
Ingredients for Ganache:
-
250g of dark chocolate
-
250g of cream 35%
Instructions for Macarons:
-
Preheat your oven to 315F, no convection
-
Pour sugar (200g) into the middle of the pot, avoiding the sides. Add enough water to fully cover the bottom of the pot and the sugar. Place the lid on the pot and turn the heat to max.
-
Place the egg whites in the mixing bowl with whisk attachment. Whip on medium-high speed until bubbles form, then slowly sprinkle (rain) sugar (100g) and turn your mixer down to low speed.
-
Test #1: Steam test. Wait for steam before you remove the lid on the pot
-
Test #2:Bubble test. Using your fork, test the syrup's density until thick enough that a bubble can be blown. Once passed, remove from heat immediately.
-
Turn egg whites on high speed and whip until they are firm and you are able to see the whisk marks
-
Slowly pour in sugar syrup, aiming the stream between the whisk and side of the bowl.
-
Continue to mix until egg whites are firm and shiny. Add food color (no more than 1 tablespoon)
-
Test #3: Meringue Trust Test. With the attachment in, flip the bowl over. Meringue shouldn't fall out.
-
Fold meringue into TPT in two stages if you’re working with a smaller bowl, or all at once if the bowl is larger. Fold until incorporated. If you are using the extra 15 g of egg whites for bad weather, add it at this time.
-
Begin macaronage. Continue to mix with spatula, making sure to wipe sides of bowl down to ensure even mixing
-
Test #4: Figure 8 test. Fold mixture onto itself to form a figure 8. Count to 10 seconds, waiting for the line to disappear.
-
Fill the piping bag and pipe mixture into small circles on parchment paper. Bang bottoms of tray to remove excess air and bake for 8-12 mins.
-
Macarons are ready when they come fully off of the tray
-
Let the macaron shells cool down before filling them with Ganache, jam, or buttercream
Method for Ganache:
-
Chop chocolate and place in a heatproof bowl.
-
Scald cream (do not boil) pour over chocolate and let stand 2 min, stir to incorporate.
-
Allow to cool before filling macarons.
Unicorn Cake Decorating
Yields one 6’’ unicorn cake
Equipment:
-
Large straight edge or offset spatula, 10"+
-
Rolling pin or empty glass wine/beer bottle
- Bowls to warm buttercream
-
Bendy spatulas/spoons
-
Sharp paring (small) knife
-
Scissors
-
Whisk (recommended)
-
Cake turntable (recommended & optional)
Vanilla Cake Ingredients:
-
160g or 1 ⅓ cups of all-purpose flour
-
2 tsp of baking powder
-
¼ tsp of salt
-
2 Eggs at room temperature
-
120ml or ½ a cup of oil
-
150g or ¾ of a cup of granulated sugar
-
1 ½ tsp of vanilla extract
-
150ml or ⅔ cup of milk at room temperature
Ingredients for the Buttercream:
-
2 cups or 400g of granulated sugar
-
4 Egg whites or 1/2 cup or 120g of Egg whites
-
2 pounds or 2cups or 908g of Butter (soft and unsalted)
-
2 teaspoons of vanilla
Instructions for Vanilla Cake:
-
Using the cake pan, trace the bottom onto parchment. Cut 2 parchment circles. Place circles in the pan so that it lines the bottom. Using 1 teaspoon of butter, grease the sides of the pan.
-
Move the rack into the middle position of the oven. Preheat the oven to 325F.
-
In a medium mixing bowl, combine the flour, baking powder and salt, mix together with a whisk and set aside.
-
In a separate mixing bowl, mix together the oil and sugar until it is well combined.
-
Whisk in the eggs one at a time, beating well after each addition. Stir in the vanilla.
-
Alternate adding the dry ingredients and milk, folding together with a spatula between each addition. Mix the batter until combined. Be careful not to over mix, which will lead to a tough dense cake.
-
Bake the cake for approximately 20-25 minutes. Each oven at home is different. Use your oven light to check in on the cake, instead of opening and closing your over door.
-
Cakes are done when you test your cake with a toothpick in the center and it comes out clean. Let the cakes cool on the counter in their pans. Once fully cool, you can remove them from the cake pans, wrap in plastic wrap and store in the freezer. Do not stack soft cakes.
Instructions for Swiss Meringue Buttercream
-
In a large bowl over a double boiler on medium to high heat, combine egg whites and sugar.
-
Slowly whisk the mixture together until sugar begins to melt and egg white becomes frothy. Be careful of hot steam from the double boiler. I like to wear oven mitts while mixing.
-
The mixture is ready when the sugar is dissolved (no gritty sugar). The mixture will also be much more runny from when you started the process of cooking.
-
Transfer the mixture to a bowl of a stand mixer fitted with a whisk attachment. Starting on medium low, mix until mixture has cooled down.
-
Once there's no visible steam coming from the mixture, turn the mixer to medium-high speed and continue mixing.
-
The mixture will triple in volume and will become white, fluffy and glossy. You can now add the butter.
-
Add softened butter gradually and whip until incorporated, then add the vanilla or the flavours of your choice.
-
Flavour the buttercream however you like, whip in extract, melted chocolate, fruit purees or even Oreo crumbs, let your creativity shine!!!
American Buttercream
Yields enough buttercream to stack and mask a 6” round cake
Ingredients:
-
900g butter (room temperature)
-
480g icing sugar (sifted)
-
Up to 250g whole milk(room temperature)
Method:
-
Mix the room temperature butter using an electric mixer until the mixture is smooth and fluffy
-
Add sifted icing sugar in 2-3 parts. Mix each time starting on low speed and mix until the mixture is homogeneous, light and fluffy.
-
Add milk a little at a time on low speed, thoroughly incorporating any liquid before the addition of more milk and scraping down the sides of the bowl from time to time. You can add more milk for a looser texture or less milk for a firmer texture.
-
Use buttercream to decorate on the same day or transfer to an airtight container and store in the fridge for up to one week or the freezer for up to three months. LET’S BAKE!
TIPS AND TRICKS:
-
you can heat up your milk to room temperature in the microwave or in a saucepan
-
icing sugar is also called “powdered” or “confectioner’s sugar” in some countries
-
granulated sugar can be used in place of icing sugar, but the frosting will be a little bit granular in texture from the sugar crystals
-
pair bold flavours which go well with butter for an ‘American’ buttercream
Sugar cookies with Royal Icing Yield: 50 small to medium cookies
Ingredients for Sugar Cookie:
-
1 ⅞ cup or 425g Butter
-
1 ¾ cup or 185g Icing sugar
-
1 Tablespoon Vanilla
-
1 Egg
-
4 ½ cups or 560g All purpose flour
Instructions for Sugar Cookies:
-
Cream butter and sugar together until light and fluffy.
-
Add the egg and vanilla and mix until combined.
-
Add flour in 2-3 rounds for easier mixing. Dough is done when flour is fully incorporated.
-
Form dough in a round disc, wrap with plastic/saran wrap and chill in the fridge overnight or in the freezer for at least half an hour before using.
-
Roll cookies out to about ½ cm in thickness and cut out shapes with desired cookie cutters.
-
Place on a cookie tray and bake for 8-12 mins at 325F.
-
Let the cookies cool on the tray before decorating with royal icing.
Ingredients for Royal Icing:
-
2 cups or 200g Icing Sugar
-
4 ½ tsp Meringue Powder
-
4-5 Tablespoons of Room Temperature Water
Instructions for Royal icing:
-
Combine all ingredients and mix with a wooden spoon or rubber spatula. Mix until light and fluffy, this should take about 1-2 minutes.
-
Once the icing is nice and thick take out what you will need for dipping and add it to a bowl. Add enough water to make the mixture runny and dipable. Add food coloring if you would like at this time.
-
Dip sugar cookies one at a time and decorate with sprinkles. Let cookies dry 2-3 hours before storing in an airtight container. Alternatively you can put icing in a piping bag and decorate.
-
Leave on the counter and enjoy cookies for up to 1 week.
Apple Pie - Recipe
Ingredients:
- 5-6 tart apples (we like to use Granny Smith, Spies, Galas, Russet, Cortland)
- 360g or 2+⅔ cup all purpose flour (plus extra for dusting)
- 285g or 1 ¼ cup COLD vegetable shortening
- 125ml or ½ cup COLD water
- 100g or ½ cup sugar (plus extra for sprinkling)
- 2-3 Tablespoons cornstarch
- ½ of a lemon or 2 teaspoons lemon juice
- 1 teaspoon ground cinnamon
- A few pinches of salt
- 1 egg for egg wash (1 egg + 2 tablespoons of water )
- 1 tablespoon brown sugar (optional)
- ½ teaspoon ground nutmeg (optional)
Method:
- In a medium sized bowl, combine the flour, salt, butter, and shortening.
- Rub shortening into the flour until reduced to pea-sized crumbs.
-
Sprinkle cold water( or water with brown sugar) over the flour mixture until it just comes together and the dough appears to have marbling throughout.
-
Transfer dough to a floured table, shape into a thick disc, cover tightly with plastic wrap and allow to rest in the freezer for at least 15 minutes before rolling.
-
Preheat the oven to 375 F. Grab your dough from the freezer. Lightly flour your work surface and begin to roll out your pie dough.
-
Once large enough to cover your pie plate, roll dough onto your rolling pin, then place in your pie dish. Cut off excess dough with a paring knife.
-
Next, peel and cut apples, then add to a bowl and mix together with sugar, cornstarch, lemon, cinnamon, and nutmeg.
-
Pour apple mixture into the crust, leaving room around the edges to seal dough. Roll out the remaining dough and place on top. Use a paring knife or fork to cut indents into the top of your dough to allow steam to escape.
- Seal the edges of your dough, then brush with egg wash and sprinkle with sugar.
-
Bake in preheated oven at 375F for 20 minutes then reduce heat to 350 ̊ F and bake for an additional 40 minutes or until the pastry is golden brown and centre of the pie is bubbling.
-
If you choose to freeze your pie, bake from frozen at 375 ̊ F for 30 minutes and 350 ̊ F for an additional 60 minutes.
Intro to Bread - Challah 2 Ways - Recipe
For the Bread (this will make 2 loaves)
- 10 grams or 2 ¼ teaspoons active dry yeast
- 50 grams or ¼ cup of granulated sugar
- 180 grams or ¾ cup of tepid water
- 50 grams or 3 tablespoons vegetable oil
- 3 eggs
- ½ tablespoon salt
- 420 grams or 3 ½ cups of bread flour (plus a little extra for dusting)
Method:
-
Add yeast into warm water. The temperature of your water is key to your bread's success, this is because Yeast is a living organism known as fungus. Fungus needs moisture and warmth to grow, this is why we bloom the yeast in warm water as part of its activation process. Essentially the water is “waking up” the yeast. If the water is too hot there is a risk of killing your yeast.
-
While the yeast is blooming, get the rest of your ingredients together.
-
Combine all dry ingredients together in a bowl.
-
Once yeast is frothy, add to dry ingredients.
-
Add oil.
-
Add eggs one at a time.
-
If mixing by hand, follow instructions 1-6 in a bowl. Once dough looks like it has come together turn out onto your counter and knead. Knead until the dough is smooth on the outside. When you press the kneaded dough lightly it will spring back. It is hard to over knead bread, don't stress about how long this process takes.
-
If using a stand mixer follow the instructions 1-6. Do not turn your mixer on high, it is not good for your mixer or the bread! Mix until a smooth dough ball forms and is able to pull away cleanly from the edges of the mixing bowl, this is a little softer dough so it may stick a little at the bottom of your mixing bowl. Take dough out of the mixer at this point and form into a ball.
- Place the dough ball in a lightly greased bowl and cover using saran wrap for its first rise. This will vary depending on how warm your kitchen is. If you have a proofing setting on your oven you can use it to proof the bread. If you do not have a proofing setting you can proof in your oven at around 70-90℉. You can also simply place the bread in a warmer area of your home or kitchen.
-
After the first proof, punch the dough down and shape into loaves. Remember this recipe can be divided into 2 loaves.
-
Once the loves are formed they will proof for a second time, make sure to cover them while they are proofing. The loaves should double in size.
-
After proofing you will bake the loaves in a 375℉, remember everyone's home oven is different, you may need to adjust the baking temperature based on your own oven it is ok to have the baking temperature a little lower if needed.
- Before removing bread from oven check temperature with thermometer it should read 190℉
Croissants
For this class you will need:
Ingredients:
- 600g AP Flour
- 10g Salt
- 7g Instant Yeast
- 50g Sugar
- 380g Milk
- 100g pliable butter
- 350g cold butter for lamination
- Egg wash for brushing the tops of croissant before they go into the oven
Making the Dough:
- Combine all of the dough ingredients, except the butter, in the bowl of the stand mixer and using the dough hook, mix, beginning at slow speed.
- When dough starts to come together add the butter. Increase speed until the dough is blended together.
- Blend until the dough comes away from the sides of the bowl and looks smooth and even (like skin), this time will vary depending on the strength of your machine and size of recipe. Approximately 10 mins.
- Remove from the mixing bowl and form into a ball.. Let the dough rest on a lightly greased surface, grease the top of dough, cover with seran wrap and let rest at least 1 hour before rolling.
Laminating the Dough:
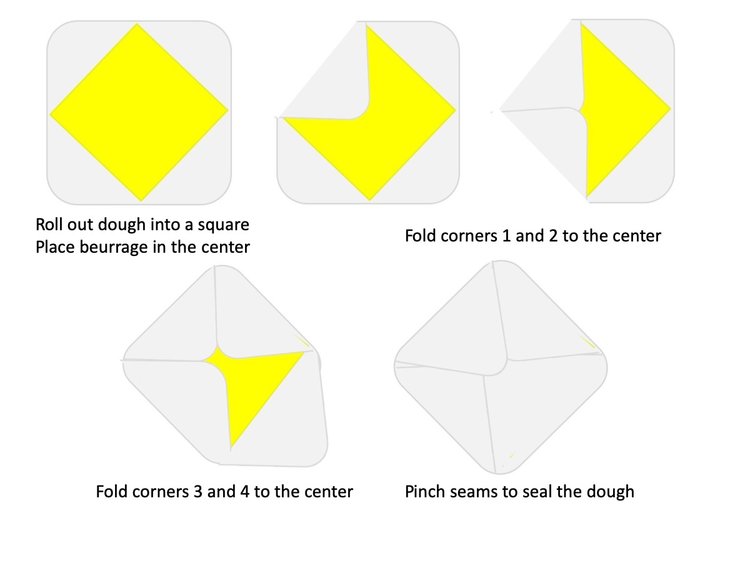
- Roll the dough into a 10x10 square or 1 forearm x 1 forearm square. Using a cheese grater, shred the butter in the middle of the dough, press down and fold dough corners into the center of the dough, like an envelope.
- Seam side up, roll the dough into a rectangle (1 forearm x 1 ½ forearm) and do a pamphlet fold (producing 3 layers). Seran wrap and rest in the fridge for 10-15 minutes.
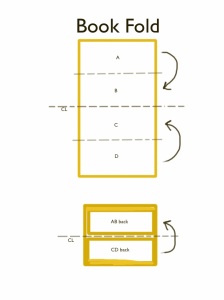
- Roll out dough to a rectangle (1 forearm x 1 ½ forearm) a second time and do a booklet turn (producing 4 layers), seran wrap again and into the fridge.
- Roll out dough to a rectangle (1 forearm x 1 ½ forearm), do the final fold, a pamphlet fold, seran wrap and into the fridge. You have now done 3 folds/ turns. Once completed you have prepared the Paton.

Rolling and Baking the Croissants:
- Roll the dough into a rectangle and cut into triangle shapes. Dough should be approximately ⅛ inch thick. You can freeze the croissants at this stage.
- Let your croissants proof and grow on a parchment lined baking sheet that you will be baking them on. Place your croissants spaced out and cover lightly with seran wrap while they grow. This step will take approximately 3-4 hours Leave on your counter top depending on the temperature of your space. The warmer environment will result in a faster proofing. Alternatively you can let your croissant grow slowly in the fridge for 7-8hours. This is a great option if you want warm croissants for breakfast. Let your croissant grow overnight in the fridge so you can bake them fresh the following morning.
- Your croissants are fully proofed when they ‘jiggle’ when you shake the tray and they have doubled in size.
- Egg wash and bake at 375 for 15-20 minutes until golden brown.
 ** Please Note: If you are planning to bake frozen croissants, they will have to thaw before proofing so the process of proofing will take longer.


